A church can spend real money on sound equipment and still struggle to hear clearly on Sunday. The equipment may not be the problem. The system has to fit the room, the setup has to be understandable, and volunteers need enough training to run it with confidence.
That church didn’t need a better sound system. They needed a better understanding of the one they had.
This is a common pattern. A church identifies a sound problem, assumes the fix is new equipment, spends money it can barely afford, and ends up right back where it started. The frustrating part is that many churches already own gear that could serve them well if someone knew how to use it.
Whether you’re starting from scratch, inheriting a setup from the previous pastor, or trying to figure out why your current system sounds muddy every other Sunday, this guide walks through what matters and what doesn’t.
What a church sound system actually does
A sound system has one job: make sure everyone in the room can hear what’s being said and sung clearly enough to participate. That sounds obvious, but it’s worth stating because it reframes every decision you’ll make. You’re not building a concert venue. You’re serving a room full of people who came to worship and hear the Word preached.
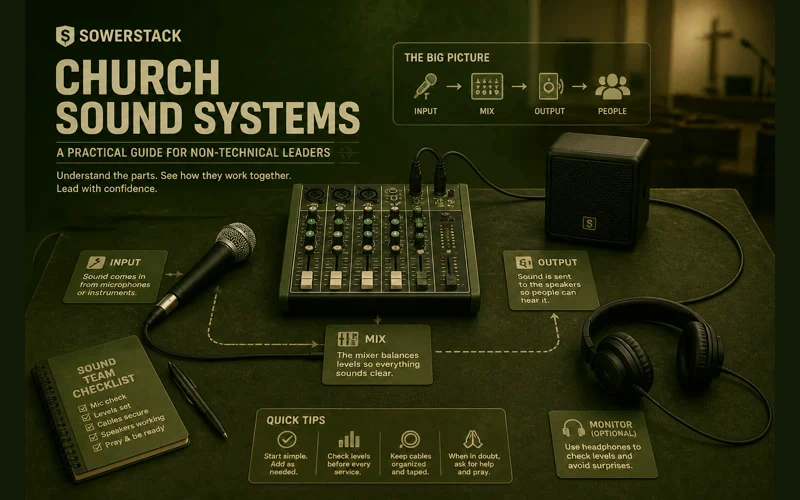
Every church sound system, regardless of size or budget, has the same basic components working together. Understanding what each one does gives you the vocabulary to diagnose problems, talk to vendors, and make purchasing decisions without feeling lost.
Microphones capture sound. A pastor’s voice, a worship leader’s guitar, a choir. Different microphones serve different purposes. A handheld mic works fine for a pastor who moves around. A lapel mic (sometimes called a lavalier) clips to your shirt and frees up your hands. Instrument mics and vocal mics are designed differently. You don’t need to memorize the specifications, but you do need to know that using the wrong mic for the wrong purpose is one of the most common reasons things sound off.
The mixer (sometimes called a soundboard or mixing console) is the central hub. Every microphone and instrument plugs into it. The mixer lets your sound operator control the volume, tone, and balance of each input. If you think of the sound system as a kitchen, the mixer is the stove. Everything gets prepared there.
Mixers come in two forms: analog and digital. Analog mixers have physical knobs and sliders for everything. They’re straightforward and affordable. Digital mixers store settings, allow remote control from a tablet, and offer more flexibility. Both work. The right choice depends on your situation, not on which one looks more impressive.
Speakers (also called mains or PA speakers) push the mixed sound out to the congregation. Their job is coverage. You need every seat in your room to receive clear, even sound. Two speakers at the front of a small sanctuary can handle 50 to 150 people in most rooms. Larger or oddly shaped spaces may need additional speakers to fill dead spots.
Monitors are speakers that face the stage, not the congregation. They let your worship team and pastor hear themselves. Without monitors, singers can’t stay on pitch because they can’t hear the music clearly. Pastors can’t gauge their own volume. Monitors don’t have to be fancy, but they have to be there.
Cables and connections are the least glamorous part of the system and the most common source of problems. A crackling sound during the sermon is almost never a broken speaker. It’s usually a worn-out cable or a loose connection. Cables are cheap. Keep spares.
Amplifiers power the speakers. Some speakers have amplifiers built in (called powered or active speakers). Others require a separate amplifier (called passive speakers). Powered speakers simplify your setup. For most churches under a few hundred people, powered speakers are the practical choice.
Assessing what you already have
Before spending anything, take inventory. Most churches have more equipment than they realize, scattered across closets, stored under the stage, or donated by well-meaning members over the years.
Start with three questions.
What do we own? Pull everything out. Identify each piece. If you don’t know what something is, take a photo and ask someone at a local music store or post it in an online forum. Churches accumulate gear over decades, and some of it may still be perfectly functional.
What’s actually connected and working? Trace the signal path from microphone to mixer to speakers. Is everything plugged in correctly? Are there components in the chain that aren’t being used? Sometimes a previous volunteer wired something in a way that creates problems nobody ever traced back to the source.
What are people in the room actually experiencing? This matters more than any spec sheet. Sit in different seats during a service. Sit in the back row. Sit on the sides. Sit under the balcony if you have one. Ask members who sit in different areas what they hear. “It sounds fine from the sound booth” means very little if the sound booth is in the back of the room and the front rows are getting blasted.
The most useful diagnostic tool you have is honest feedback from people sitting in the seats. Not from the sound operator’s position. Not from the stage. From the seats.
When to upgrade vs. when to train
They buy new equipment when the real problem is operator knowledge.
A $2,000 digital mixer in the hands of someone who doesn’t understand gain structure will sound worse than a $300 analog mixer run by someone who knows what they’re doing. Equipment doesn’t fix skill gaps. Training does.
Consider training first if any of these are true: your sound operator learned by trial and error and has never had formal instruction. Your system sounded good at one point but has gradually gotten worse. Different volunteers produce wildly different results on different Sundays.
Training doesn’t have to mean hiring a professional audio engineer. YouTube has hundreds of hours of free church sound training. Channels dedicated specifically to church audio cover everything from basic mixer operation to advanced EQ techniques. A volunteer who spends three hours watching tutorials and practicing on your actual equipment will produce noticeably better results the following Sunday.
Consider upgrading equipment when the gear is physically failing. Speakers that buzz or distort even at low volumes. A mixer with channels that cut in and out. Microphones that produce static no matter which cable you use. These are hardware problems, and no amount of training fixes broken equipment.
Also consider upgrading when your room has genuinely outgrown your system. If you’ve added seating and your speakers can’t cover the additional space, that’s a real equipment need. If you’ve added instruments to your worship team and your mixer doesn’t have enough inputs, that’s a real equipment need.
The honest question to ask is: have we maxed out what our current equipment can do, or have we maxed out what our current team knows how to do with it?
Budget tiers: what’s realistic
Sound equipment ranges from modest to astronomical. For churches working with limited resources, it helps to think in practical tiers.
Around $500: The Starter Setup
This gets you a basic powered speaker or two, a simple analog mixer with four to eight channels, two decent microphones, stands, and cables. It’s enough for a small room with spoken word and maybe an acoustic instrument or two. You won’t win any audio awards, but the congregation will hear the sermon clearly. Companies like Behringer and Mackie make reliable entry-level gear at this price point.
This tier works well for church plants meeting in rented spaces, small congregations in modest rooms, or churches replacing a single failing component. You can find this kind of gear at retailers like Sweetwater or B&H, both of which carry a wide selection and have staff who can answer questions specific to your setup.
Around $2,000: The Solid Foundation
At this level, you can get a decent digital mixer, a pair of quality powered speakers, two to four microphones suited to your specific needs, a set of monitor speakers for the stage, proper stands and cabling, and possibly a basic wireless microphone system. This setup handles a worship team with vocals and a few instruments in a room of 100 to 200 people.
It’s enough to sound good without being more technology than your team can manage.
$5,000 and up: The Purpose-Built System
This range allows for professional-grade speakers matched to your specific room, a digital mixer with tablet control and scene recall, multiple wireless microphone systems, a proper monitor setup (potentially in-ear monitors for the worship team), acoustic treatment for the room, and professional installation and tuning.
At this level, it’s worth bringing in a professional to assess your room and recommend specific equipment. The room itself becomes a major factor. Sound behaves differently in a gymnasium than in a traditional sanctuary. A professional can identify acoustic problems that no amount of equipment will fix and recommend treatments like acoustic panels that make everything else work better.
One note on all three tiers: buy the best you can afford in speakers and microphones first. These are the components that most directly affect what people hear. You can upgrade your mixer later, but good speakers and microphones make every other component in your chain sound better.
Common mistakes churches make with sound
Putting the sound booth in the wrong place. The person mixing your sound needs to hear what the congregation hears. If your sound booth is in a separate room, behind glass, or in a balcony far from the main seating area, your operator is mixing blind. They’re adjusting levels based on what they hear in their isolated position, which may be completely different from what’s happening in the room. The ideal position for your sound operator is in the middle of the congregation, roughly two-thirds of the way back from the stage.
Running the system too hot. “Louder” is not the same as “clearer.” When everything is pushed to maximum volume, the sound distorts, the low frequencies get muddy, and people in the front rows start wincing. If you’re turning everything up to be heard, the problem is usually speaker placement or room acoustics, not volume. Pulling the overall level back and focusing on clarity will serve the room better than raw power.
Neglecting maintenance. Cables wear out. Connections corrode. Speakers collect dust. Mixers develop quirks over time. A quarterly checkup of your entire system takes an hour or two and prevents Sunday morning surprises. Replace worn cables before they fail during a service. Clean connections. Test every input. Preventive maintenance costs almost nothing compared to emergency replacements.
No documentation. When the one volunteer who knows how to run the sound system moves away, all that knowledge walks out the door with them. Write down your settings. Take photos of the mixer with everything dialed in correctly. Create a simple one-page guide that shows a new volunteer how to turn the system on, set basic levels, and shut it down properly. This isn’t busywork. It’s stewardship of institutional knowledge.
Ignoring the room. Hard, flat surfaces reflect sound. Carpet absorbs it. High ceilings create echo. Low ceilings create boominess. The same speakers in two different rooms will sound completely different. If your room has a lot of hard surfaces (concrete walls, tile floors, no ceiling treatment), even expensive speakers will struggle with echo and muddiness. Simple acoustic treatments like fabric panels on walls can dramatically improve clarity for a few hundred dollars.
Finding local help
Not every church needs a full-time audio engineer. But every church benefits from having someone knowledgeable assess their setup at least once.
Start with your own congregation. It’s surprisingly common for churches to have members with audio experience who’ve never been asked. People who work in live events, musicians who’ve done studio work, even hobbyists who record podcasts. They often have enough knowledge to identify your biggest issues.
Local music stores and pro audio shops are another resource. Many will do a basic consultation, especially if you’re considering purchasing equipment from them. They can look at your room, listen to your system, and give you practical recommendations that account for your specific space.
Regional church networks and denominations sometimes have technical resources or can connect you with churches in your area that have recently gone through a sound system upgrade. Their experience and the mistakes they made along the way can save you significant time and money.
If you do hire a professional, look for someone who has worked with churches or similar venues before. A sound engineer who specializes in concert touring may design a system that’s far more than you need. Someone who understands the dynamics of a worship service (spoken word, congregational singing, small musical ensembles, varying room occupancy) will make recommendations that actually fit how you use your space.
The real goal
Good sound in a church isn’t about impressing anyone. It’s about removing barriers. When the congregation can hear the sermon clearly, they can engage with the tangleage. When the worship team can hear themselves, they can lead with confidence. When a visitor walks in and the audio is clean and balanced, they’re not distracted by technical problems. They can focus on why they came.
You don’t need the best system. You need a system that works for your room, your team, and your congregation. Most of the time, getting there requires more knowledge than money.
The church that spent $4,000 and still couldn’t hear their worship leader? They eventually solved it. Not with more equipment, but with a member who spent a weekend learning how their mixer worked, repositioning two speakers, and replacing three cables that had been slowly failing for months. Total additional cost: about $40.
The equipment was never the problem. Understanding was.
Recent Posts
-
 “Broadcast” was a farming word first, and it changes how you read Matthew 13
 -
 What broadcasting actually looks like in an ordinary week
 -
 The one ChMS report that tells you if people are actually connecting
 -
 Breeze vs ChurchTrac: Which One Fits a Smaller Church Better?
 -
 How to evaluate church management software for your size church