A church can spend a great deal of money on audio equipment and still struggle to make the sermon clear. A new mixer can sit in the booth, new speakers can hang on the wall, and the same old questions can show up by the second song. Why does the vocal sound muddy? Why does the pastor’s mic feed back near the front row? Why does the livestream sound so different from the room?
Those questions are not proof that the purchase was unwise. They are a reminder that sound is a system. Equipment is part of that system, but the whole pathway shapes what people hear. The room matters. The operator and microphone technique matter. Stage volume and Sunday routine matter too.
That distinction matters for churches with limited resources. If you assume every audio problem requires a gear purchase, you may overlook the improvements that are already within reach. If you understand the whole system, you can make better decisions about what to adjust now and what to buy later.
Good audio is not about sounding professional for its own sake. It is about removing friction from preaching, prayer, worship, testimony, and invitation. When people can hear clearly, they can participate more fully. Clarity serves ministry.
Begin by treating sound as a pathway
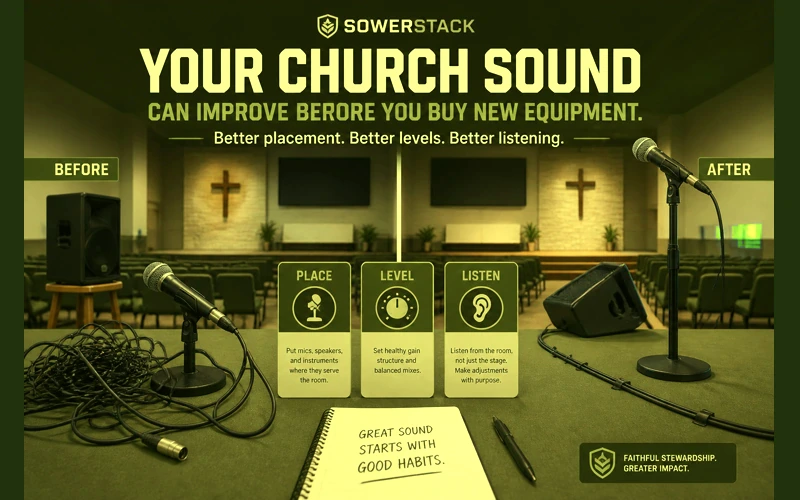
Improve the path before replacing the gear
The first upgrade is often a better process, not a bigger purchase.
Sound travels through a pathway before it reaches a person in the room. A voice enters a microphone, moves through a cable or wireless pack, reaches the mixer, passes through processing, comes out of speakers, interacts with the room, and finally reaches someone’s ears.
Every part of that pathway can help or hinder clarity. A good microphone placed poorly may still sound distant. A capable speaker aimed at a reflective wall may still make speech hard to understand. A careful musician may still struggle if the monitor is not aimed toward their ears.
This is why gear-only thinking can become frustrating. The purchase may improve one part of the pathway while the rest of the pathway remains unchanged. The new piece of equipment may be working exactly as designed, but it is still being asked to solve a problem that belongs somewhere else.
A more faithful approach starts with assessment. Where does the signal become unclear? Does the problem begin at the microphone? Does it show up at the board? Does it only happen when the sound reaches the room? These questions keep you from guessing.
The room shapes every sound you make
A worship room is part of the sound system whether you planned it that way or not. Hard floors, bare walls, glass, low ceilings, and parallel surfaces all affect how speech and music behave after they leave the speakers.
Sound does not stop when it reaches the first listener. It reflects from surfaces and returns to the room milliseconds later. Those reflections can blur words, smear musical detail, and make the whole room feel louder without becoming clearer. The person at the back may hear both the direct sound from the speaker and a delayed copy from the wall behind them.
Speech clarity depends on managing those reflections. A room with long reverberation can make a sermon feel distant even when the microphone is working. A room with a strong slapback echo can make consonants difficult to hear. People may describe the result as muddy because that is what it feels like.
You can begin with simple observations. Clap once in the empty room and listen for ringing or flutter. Stand where people sit and listen while someone speaks through the system. Walk to the back and notice whether the words remain distinct. These are not professional measurements, but they help you understand the room you actually have.
Small treatment changes can make a real difference. Heavy curtains over glass, fabric panels on a rear wall, rugs in strategic places, or bookshelves along a flat wall can reduce reflections. You do not need to cover every surface. Start with the surfaces that send sound directly back into the listening area.
Speaker placement matters more than volume
Speakers should aim sound toward people, not toward reflective surfaces. A speaker that points above the congregation may energize the ceiling before it serves the room. A speaker aimed across a hard side wall may create reflections that compete with the direct sound.
Placement often explains why turning the system up does not help. More volume sends more energy into the same room problems. If the speaker angle is wrong, the louder signal may make reflections stronger while the words remain unclear.
Check whether your speakers cover the listening area evenly. Stand under them, near the front, in the middle, and toward the back. Listen for places where the sound becomes harsh or disappears. If one side of the room is much louder than the other, placement or balance may need attention.
Do not move mounted speakers casually. Safety matters, and permanent changes may require qualified help. You can still learn from careful listening and temporary tests. A portable speaker on a stand can reveal how aim and height affect clarity before you make a larger decision.
Subwoofers and low frequencies need special care. Bass builds up in corners and can make the room feel cloudy. If your room feels muddy, lowering low-frequency energy may help more than raising vocal volume. Clear sound often comes from restraint.
Microphone technique is a ministry skill
A microphone is designed to hear from a certain distance and direction. When it is used outside that range, the board operator has to compensate. That compensation often increases room noise and stage bleed. It can also raise the risk of feedback.
Handheld microphones usually need to be close to the mouth. Two to four inches is a useful starting point for many dynamic vocal microphones. If a singer holds the mic at chest level, the microphone hears more room than voice. The operator raises the gain, and the system becomes more sensitive to feedback.
Angle also matters. A slight off-axis angle can reduce plosive bursts from hard consonants while keeping the voice present. Cupping the grille of a handheld microphone changes the pickup pattern and can make feedback more likely. These are simple habits, but they need to be taught patiently.
Lapel microphones require careful placement. Clip the mic high enough to capture the voice clearly, usually several inches below the chin. Avoid clothing that moves or jewelry that can brush the capsule. If the speaker turns their head often, a headset mic may provide more consistent pickup.
Teach microphone technique as service, not criticism. The person using the mic is trying to help the church sing or hear. A short conversation before rehearsal can prevent a long struggle during service. Clear instruction honors the person and the room.
Gain staging is the foundation at the board
Gain is the first major level decision in the mixer. It controls how much of the microphone or instrument signal enters the channel before the fader shapes its place in the mix. If gain is set poorly, later adjustments become harder.
Set gain while the person speaks or plays at the level they will use during service. Watch the meter and aim for a healthy signal that does not clip. On many digital consoles, peaks around minus eighteen to minus twelve decibels give you enough signal without crowding the top of the meter.
Low gain forces the operator to raise the fader and may bring up noise. High gain can distort the signal before it ever reaches the mix. Both problems can make volunteers reach for EQ or volume changes that do not address the foundation.
Teach every sound volunteer to set gain first. Make it part of the Sunday checklist. When gain staging becomes consistent, the board feels less mysterious and the mix becomes easier to repeat from week to week.
Digital consoles can save scenes, but saved scenes should not replace listening. A saved setting may be a good starting point. It still needs to be checked against the actual person, instrument, and room on that Sunday.
Use EQ with restraint
Equalization can improve clarity, but it can also create new problems when it becomes the first answer for every issue. Boosting frequencies adds energy to the system. That energy may make feedback more likely or exaggerate room reflections.
A careful approach often begins by removing what clouds the sound. If a vocal feels muddy, a modest cut in the low-mid range may help. If a microphone carries too much rumble, a high-pass filter can reduce energy that does not serve the voice. If a guitar feels boxy, a small cut may open space for the vocal.
Make changes while listening to the room, not while staring at the screen. The best-looking curve is not always the clearest sound. Move slowly and make one adjustment at a time so you know what changed.
Resetting channels to a sensible baseline can help volunteers learn. Start flat, add high-pass filters where appropriate, and make modest cuts only when the room asks for them. This practice builds ears over time.
Do not use EQ to compensate for every placement issue. If a monitor points into a vocal mic, EQ may reduce one feedback frequency while another appears. Moving the monitor may solve the deeper issue. Physical problems often need physical answers.
Stage volume can decide the whole mix
The sound in the room includes more than the main speakers. Guitar amps and drums contribute to what people hear. Floor wedges and acoustic instruments also shape the room. Unamplified voices can do the same. The board operator can only mix what they can control.
If stage volume is too loud, the main mix may become a thin layer on top of an already noisy platform. The operator may lower channels in the house, but the room still hears the stage. This can make vocals harder to place and sermons feel disconnected after music.
Stage volume is not a moral failure. It is usually a practical issue that needs shared expectations. Musicians need to hear well enough to serve confidently. The room also needs enough space for the main speakers to carry a balanced mix.
Monitor placement helps. A wedge aimed at the performer’s ears can be lower than a wedge aimed at the knees. In-ear monitors can reduce stage volume when they are used carefully. Shielding and amp direction can help. So can drum control and thoughtful arrangement choices.
Talk about stage volume before Sunday pressure begins. A rehearsal or midweek practice is a better time to adjust habits. People receive correction more easily when they do not feel exposed in front of the church.
Reduce reflections that blur speech.
Keep voices close and consistent.
Set clean signal before mixing.
Check the same path every week.
A sound check is not optional care
A sound check gives the system a chance to fail before the service begins. That may sound negative, but it is actually merciful. It is better to discover a dead battery, a muted channel, or a feedback-prone monitor when there is still time to respond calmly.
Check each active channel at performance level. Set gain and confirm routing. Listen in the room, then make sure monitors are usable. Then run at least one complete song or service element so the system is tested as a whole.
The sermon mic should receive special attention. Spoken word clarity matters for people in the room and for anyone listening later. Confirm that the mic reaches the main speakers and the livestream. Check the recording and any assisted listening feed your church uses.
A written sound check routine protects the church from depending on one person’s memory. If the regular operator is gone, another trained volunteer should be able to follow the same path. Consistency is one of the simplest forms of care.
Training volunteers protects people from pressure
Most church sound volunteers are not trying to be difficult when the mix struggles. They are often generous people serving with limited training in a role that everyone notices only when something goes wrong.
Training gives them language and confidence. Teach signal flow. Teach gain staging. Teach how to identify feedback. Teach the difference between room sound and stream sound. Short, steady instruction over several months usually serves better than one overwhelming workshop.
Pair newer volunteers with experienced ones. Let them practice during rehearsal or before the room fills. Give them permission to ask questions. A volunteer who understands why a step matters is more likely to repeat it faithfully.
Keep training practical. Choose one skill at a time. One week might focus on setting gain. Another week might focus on monitor placement. Another might focus on listening from different seats in the room. Small skills become a dependable system.
Encouragement matters here. Sound volunteers carry invisible pressure. A clear process and a patient leader can help them serve with less anxiety and more attention.
Know when equipment really is the issue
Sometimes equipment does need attention. A damaged cable or failing wireless unit can limit what is possible. The same is true of an underpowered speaker, noisy mixer channel, or worn connector. Good stewardship does not mean refusing to buy gear. It means buying after you understand the need.
Look for evidence before making a purchase. Does the problem follow the cable when you move it? Does the same microphone fail on multiple channels? Does the speaker distort at reasonable volume even with a clean signal? Does the wireless pack drop out in the same location every week?
Evidence helps you spend wisely. You may discover that a few new cables solve a recurring issue. You may learn that a microphone placement change matters more than a microphone upgrade. You may also confirm that a piece of gear has reached the end of its useful life.
When you do buy, buy for fit. A small church does not need to imitate a large venue to serve people well. You need equipment that matches your room and your volunteers. It should also fit your service pattern and your ability to maintain it.
Ask whether the purchase will make the system clearer or just more complex. Complexity is not always wrong, but it carries a training cost. A tool that no one understands may create more Sunday pressure than it removes.
Use the livestream as a separate listening room
Online audio deserves its own check because the livestream listener is not hearing the room in the same way. The in-room mix includes natural reflections and acoustic energy. The stream only receives the feed you send.
If the stream sounds thin, the issue may not be the main speakers. If the stream lacks music balance, the room mix may not translate through the output feeding your encoder. If the sermon sounds distant online, the mic may be too low in the stream mix even though it is clear in the sanctuary.
Check the stream on a separate device before service. Listen for clear speech and stable levels. Watch for obvious distortion. Make sure the recording device has storage and that the encoder receives signal. These checks serve people who are home, traveling, sick, exploring the church, or revisiting the sermon later.
A separate stream mix is helpful when your system allows it. If that is not possible, document the best settings you can achieve with your current setup. Consistency helps even when the system is simple.
Make improvement a weekly habit
Church audio improves when small habits become normal. A room walk, a battery check, a gain pass, a monitor listen, and a stream check can change the quality of a Sunday without changing the equipment.
Do not try to repair the entire system in one week. Choose the most obvious source of confusion and address it. If sermon clarity is the concern, focus on the pastor’s microphone and speaker coverage. If worship feedback is the concern, focus on monitor placement and gain. If online audio is the concern, focus on the feed before buying cameras or lights.
Keep notes. Write down what changed and whether it helped. Volunteers learn faster when the church builds a shared memory. Notes also prevent the same problem from being rediscovered every month.
Invite feedback carefully. Ask a few trusted listeners whether speech was clear in their section of the room. Avoid turning Sunday morning into an open forum for audio preferences. You need useful observations, not a collection of competing tastes.
Clear sound serves faithful ministry
Audio does not create spiritual life. It cannot make a sermon true, a prayer sincere, or a song faithful. It can only help remove avoidable distractions so the church can attend to what matters.
That is enough reason to care. The person hearing the gospel for the first time should not have to fight the room to understand the words. The older member with diminished hearing should not be forgotten by the system. The person watching from home should not receive a distorted version of the service because no one checked the feed.
Your church may not need new gear first. You may need clearer microphone habits, better gain staging, calmer monitor placement, simple room treatment, and a written Sunday routine. Those improvements are not second-class solutions. They are often the exact kind of stewardship a church can practice immediately.
When equipment is needed, you will know why. Until then, begin with the pathway you already have. Listen carefully. Adjust patiently. Train the people who serve. Build a system that helps the message be heard.
If your church is trying to turn a frustrating audio setup into a clearer ministry pathway, we can help you assess the system before you make the next purchase.
Recent Posts
-
 “Broadcast” was a farming word first, and it changes how you read Matthew 13
 -
 What broadcasting actually looks like in an ordinary week
 -
 The one ChMS report that tells you if people are actually connecting
 -
 Breeze vs ChurchTrac: Which One Fits a Smaller Church Better?
 -
 How to evaluate church management software for your size church