Some churches run children’s check-in with a notebook, a volunteer, and makeshift name labels. That can work for a season, but it gets fragile when the children’s area grows and the line starts backing into the hallway.
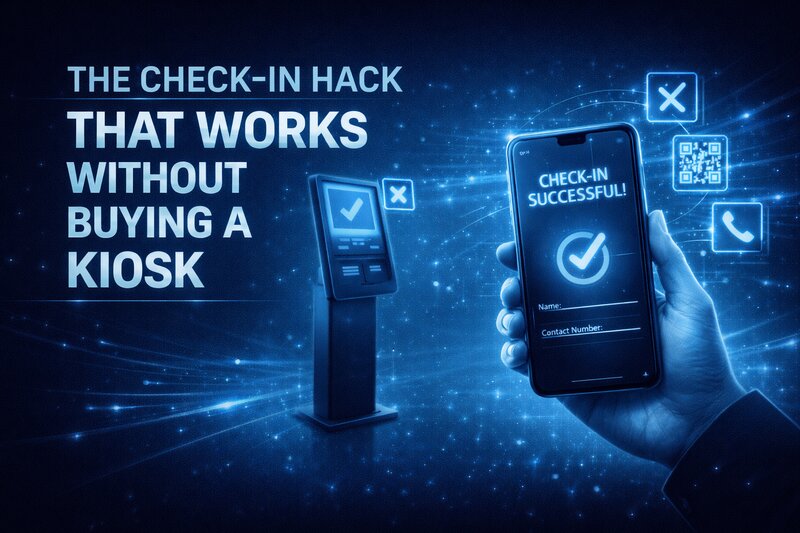
A full kiosk may still be too expensive. A tablet or phone, a free or low-cost app, a simple mount, and a printer can give the church a faster check-in process without a dedicated kiosk purchase.
Why dedicated kiosks cost what they cost
Dedicated check-in kiosks are purpose-built hardware. They include a touchscreen, a built-in label printer, a secure enclosure, and software designed for a single task. They’re sturdy, professional, and reliable. Churches that can afford them often love them.
They also start at $1,000 and frequently run $2,000 to $3,000 per station when you factor in the hardware, the software license, and the label printer bundled into the unit. For a church that needs two stations (one for the kids’ wing, one for the nursery), the cost doubles. Annual software subscriptions add $200 to $600 per year on top of that.
None of that pricing is unreasonable. The companies making these kiosks have built solid products and they deserve to be paid for them. But a church planter meeting in a school cafeteria, or a congregation of 120 that just replaced its HVAC system, or a rural church with a $3,000 monthly operating margin does not always have $2,500 sitting available for check-in hardware.
The assumption behind kiosk pricing is that every church operates with the same budget flexibility. That assumption doesn’t match reality for most of us.
The good news: the core technology inside a $2,000 kiosk is not fundamentally different from the technology inside a $150 tablet. Both have touchscreens. Both run apps. Both connect to printers. The kiosk wraps that technology in a purpose-built shell with some added durability. But the technology itself is available to every church, at a fraction of the price, right now.
What you actually need
The entire DIY check-in station requires four components. Each one is straightforward.
A tablet or phone. An iPad, an Android tablet, or even an older smartphone with a screen large enough for parents to tap comfortably. You don’t need the newest model. A refurbished iPad from two generations ago works perfectly. If someone in your congregation has an old tablet sitting in a drawer (and they almost certainly do), that’s a $0 starting point.
Screen size matters more than processing power. Aim for at least an 8-inch screen. Parents are tapping names and numbers, not editing video. A 10-inch iPad is ideal, but a large Android tablet works just as well.
A tablet stand or mount. This keeps the device upright, visible, and stable on a table. You can buy a basic adjustable tablet stand for $15 to $30. If you want something more permanent, wall mounts and floor stands are available for $30 to $75. The key is stability: the tablet should not wobble or fall when a parent taps the screen.
For churches that move locations each week (portable church plants, school rentals, community center setups), a tabletop stand that fits in a bin is the best choice. For churches with a permanent building, a wall mount near the classroom entrance looks clean and keeps the table surface free for other things.
A thermal label printer. This is the piece that makes the system feel professional. A thermal label printer produces adhesive name tags with the child’s name, the parent’s name, a pickup code, the classroom assignment, and allergy information. The tags print in about two seconds.
The Brother QL-800 runs about $70 and handles standard check-in labels reliably. The DYMO LabelWriter 450 is another popular option at a similar price point. Both connect via USB, and some models offer Bluetooth, which means fewer cables on your check-in table.
Thermal printers use heat instead of ink. That means no ink cartridges to replace, ever. The only recurring cost is the label rolls themselves, which run $10 to $15 for a roll of 300 labels. For most churches, a single roll lasts several weeks.
Check-in software. This is the app that runs on the tablet, manages the database of children and families, and sends print commands to the label printer. Several options are available, and many churches already have access to one through their church management software.
Planning Center Check-Ins is one of the most widely used options. If your church already uses Planning Center for services or volunteers, Check-Ins integrates directly. It’s included in Planning Center’s pricing tiers, and the free tier covers churches with basic needs.
Breeze ChMS includes a check-in feature in its standard subscription. If you’re already paying for Breeze as your church management system, you already have check-in capability built in.
ChurchTrac offers check-in functionality and has a free tier for smaller churches. For a church plant or a congregation under 75, this can be a zero-cost entry point for both church management and check-in.
KidCheck is a dedicated children’s check-in platform starting around $30 per month. It’s more specialized than the all-in-one church management tools, with features like guardian photo matching and customizable security labels.
For churches that want the simplest possible starting point, even a Google Form on a tablet can serve as a basic check-in system. It won’t print labels, but it captures the data, timestamps the entry, and gives you a searchable record. That’s a meaningful step up from the spiral notebook, and it costs nothing.
Setting it up: step by step
The physical setup takes about thirty minutes. The software configuration takes another hour or two, mostly spent entering your existing roster of children and families into the database. After that initial setup, Sunday mornings run themselves.
Step 1: Choose your check-in software and create your account. If your church already uses a management platform that includes check-in (Planning Center, Breeze, ChurchTrac), start there. You’ll avoid paying for a second system and your family data is likely already in the database. If you’re starting from scratch, sign up for a free account with one of the platforms listed above.
Step 2: Enter your rooms and classrooms. Most check-in apps organize by location. Create entries for each room where children will be: nursery, toddlers, preschool, elementary, and any other age-based or grade-based groupings your church uses. Set the age or grade ranges for automatic room assignment so the system knows where each child belongs.
Step 3: Enter your family and child data. If you’ve been using a notebook or paper sign-in, you probably have names, ages, and parent contact information somewhere. Enter that information into the check-in system. This is the most time-consuming step, but it only happens once. After the initial data entry, new families get added as they arrive.
Most platforms let you import data from a spreadsheet. If you can get your existing records into a CSV file (columns for child name, birthdate, parent name, phone number, allergies), the import takes minutes instead of hours.
Step 4: Set up the tablet. Download the check-in app onto your tablet. Sign in with your account. Most apps have a dedicated “station mode” or “kiosk mode” that locks the tablet into the check-in interface so parents can’t accidentally navigate away from the app. Enable that mode.
On an iPad, you can also use Guided Access (Settings > Accessibility > Guided Access) to lock the device to a single app. This prevents anyone from swiping out of the check-in screen, pressing the home button, or accessing other apps. It turns any iPad into a single-purpose check-in station.
On Android tablets, most check-in apps offer their own kiosk lock. You can also use Android’s built-in Screen Pinning feature (Settings > Security > Screen Pinning) for the same effect.
Step 5: Connect your label printer. Plug the thermal printer into power and connect it to the tablet via USB or Bluetooth, depending on your printer model. In the check-in app’s settings, select the printer and print a test label. Adjust label size settings if needed (most check-in apps default to standard 2.25-inch labels, which work with both Brother and DYMO printers).
Run a full test: search for a child in the system, check them in, and confirm that the label prints correctly with the child’s name, room assignment, parent info, and security code.
Step 6: Set up the physical station. Place the tablet on its stand at a comfortable height for parents. Most adults prefer the screen at roughly chest or waist height when standing. A standard folding table works for a tabletop stand. Place the label printer next to the tablet, close enough that the USB cable reaches without tension.
Keep the setup clean. One tablet, one printer, one power strip. Tape the cables down with gaffer tape if they cross a walkway. Make a small sign that says “Children’s Check-In” so new families know where to go.
Step 7: Do a dry run before Sunday. Recruit two or three parents to walk through the process on a Saturday or Wednesday evening. Watch where they hesitate. Listen to what questions they ask. Adjust the workflow based on what you observe. The goal is a check-in that takes under 30 seconds per family, without a volunteer needing to intervene.
Handling common concerns
“What about security?” The security model in a tablet check-in is identical to what the expensive kiosks use. When a child checks in, the system generates a unique security code that prints on both the child’s name tag and the parent’s pickup tag. The child can only be picked up by someone holding the matching code. This is the same approach used by churches running $3,000 kiosk systems. The security comes from the software, not from the hardware enclosure.
For additional security, most check-in platforms let you require a PIN or phone number lookup at check-in, add guardian photos to the family profile, flag allergies and medical notes on the printed label, and send text alerts to parents if their child needs them during the service. These features work on a $150 tablet exactly the same way they work on a dedicated kiosk.
“What if the tablet breaks or freezes?” Keep a backup plan for the first few weeks while your team builds confidence. A clipboard with blank check-in forms and a pack of pre-printed name tag stickers costs about $5 and takes up no space. If the tablet goes down, the volunteer switches to paper for that service and enters the data digitally afterward.
In practice, tablet check-in is more reliable than most people expect. An iPad in Guided Access mode running a single app has very little reason to crash. But having a paper backup eliminates the anxiety, and that matters during the transition.
“Will parents actually use it?” Most parents are already comfortable checking in on tablets. They do it at the doctor’s office, at the airport, at restaurants. The interface is familiar. First-time visitors may need a brief orientation from your volunteer (“Just type your last name and follow the prompts”), but returning families will be self-sufficient within two or three Sundays.
The real shift is for your volunteers. Instead of being data entry clerks, they become greeters. They welcome families, help first-time visitors navigate the process, and walk new kids to their classrooms. That’s a better use of their time and their gifting.
“What about families without a child in the system?” First-time visitors will need to be added to the database. Most check-in apps include a “New Family” button on the check-in screen that lets parents enter their own information on the spot. It takes about 60 seconds. Your volunteer can assist if needed, but the process is designed to be self-service.
Some churches pre-register families through their website. A simple online form (linked from the church website, the bulletin, or a QR code at the entrance) lets parents enter their family information before they ever arrive on Sunday. When they walk up to the check-in station, their family is already in the system.
What this costs, all in
A realistic budget for a complete DIY check-in station looks like this:
Refurbished iPad or Android tablet: $100 to $200 (or $0 if donated). Tablet stand: $15 to $30. Thermal label printer: $60 to $80. Label rolls (first supply): $10 to $15. Check-in software: $0 to $30 per month, depending on platform.
Total hardware cost for one station: roughly $185 to $325. Compare that to $1,200 to $3,000 for a dedicated kiosk. The savings are significant enough to matter, especially when you consider that many churches need two stations.
If your church already uses a church management platform with check-in included, the software cost may be $0. If someone in your congregation donates a used tablet, the hardware cost drops further. We’ve seen churches put together a fully functional check-in station for under $100.
A word about doing it well
The fact that this approach costs less does not mean it should feel cheap. Presentation matters, not because we’re trying to impress anyone, but because the check-in process is often a family’s first interaction with your children’s ministry. It sets a tone.
A clean station with a stable tablet, a printed sign, and a friendly volunteer communicates competence and care. A tablet propped against a water bottle on a wobbly card table communicates something else entirely. The difference between those two setups is not money. It’s intentionality.
Use a proper stand. Print a simple sign. Secure the cables. Place the station where families naturally walk. These details cost almost nothing, but they signal to parents that you’ve thought about their experience and their child’s safety.
Moving beyond the first station
Once your first station is running smoothly, you can expand. A second tablet and stand at a different entrance costs another $130 to $200. You can share the same printer if the stations are close together, or add a second printer if they’re in different areas of the building.
Some churches set up a self-service station in the lobby and a volunteer-assisted station at the classroom entrance. The lobby station handles returning families who know the system. The classroom station catches new visitors and families who need help. This two-station approach keeps the line moving while still providing a personal welcome where it matters most.
Over time, your check-in data becomes genuinely useful. You can see attendance trends for individual children. You can identify families who haven’t been in three weeks and follow up with them. You can track which classrooms are growing and staff accordingly. You can pull reports for your children’s ministry volunteers showing exactly who to expect each Sunday.
None of that was possible with the spiral notebook. And none of it required a $2,000 kiosk to start.
The point underneath the point
Every church has to make decisions about where money goes. Those decisions reveal priorities, and they should. A church that puts $2,500 toward a check-in kiosk has made a reasonable decision about efficiency and professionalism. That’s a valid choice.
But a church that can’t spend $2,500 right now hasn’t made a wrong direction. They’ve made a different one. And that different decision doesn’t have to mean accepting a worse check-in experience. It means building the same capability with more creativity and less cash.
The tablet on the folding table does the same job as the kiosk in the custom enclosure. The labels print the same. The security codes generate the same. The parents check in the same way. The children are just as safe.
What differs is the price tag. And in ministry, the price tag should never be the thing that determines whether we do something well. Faithfulness and resourcefulness have always gone together. A church that figures out how to serve families excellently with a $150 tablet is practicing the same stewardship as a church that invests in dedicated hardware.
The spiral notebook served that east Texas church well for three years. It was the right tool for that season. The tablet is the right tool for this one. And when the day comes that a kiosk makes sense for the budget, the transition will be seamless because the software, the data, and the habits are already in place.
Start where you are. Use what you have. Serve the families walking through your door this Sunday.
Recent Posts
-
 “Broadcast” was a farming word first, and it changes how you read Matthew 13
 -
 What broadcasting actually looks like in an ordinary week
 -
 The one ChMS report that tells you if people are actually connecting
 -
 Breeze vs ChurchTrac: Which One Fits a Smaller Church Better?
 -
 How to evaluate church management software for your size church